Since April 19th, when MySQL 8.0 became Generally Available (GA), the MySQL community has been abuzz with excitement over all of the new features and improvements. Many of new features were improvements to performance or monitoring, while others were specifically related to replication. We reviewed Replication Performance Enhancements in MySQL 8 recently. Today’s blog will describe how to set up a basic master-slave configuration with MySQL, using two servers on a single machine.
Replication Defined
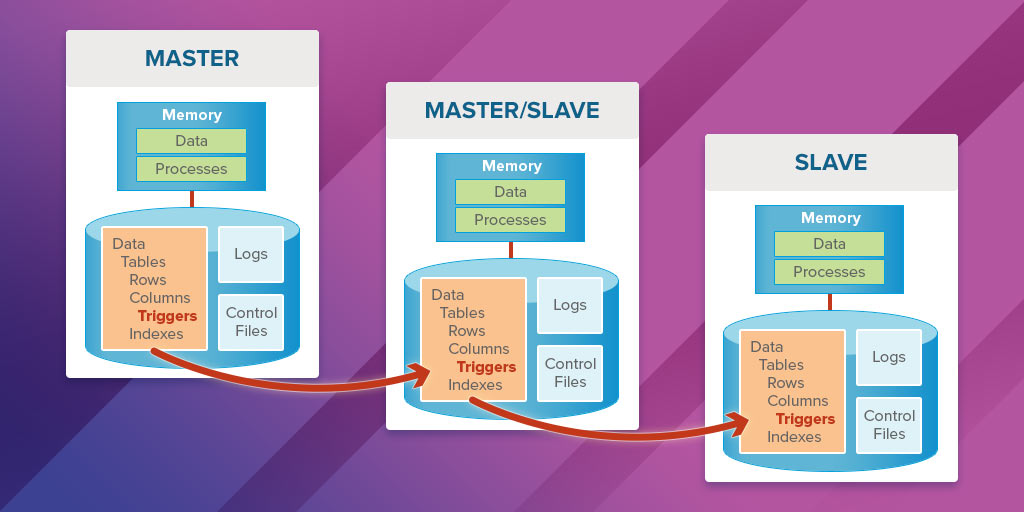
MySQL replication is a process in which data from one MySQL database server (the master) is copied automatically to one or more MySQL database servers (the slaves). In the case of multiple slaves, these are usually referred to as a slave cluster. Replication should not to be confused with backup operations. Whereas the aim of backups is to protect the data and/or data structure, the role of replication is typically to spread read and write workloads across multiple servers for the purposes of scalability. In some cases, replication is also employed for failover, or for analyzing data on the slave in order to lessen the master’s workload.
Master-slave replication is almost always a one-way replication, from master to slave, whereby the master database is employed for write operations, while read operations may be performed on a single slave database or spread across several slaves. This is because the ratio of read requests is almost always higher than writes for most applications. If your single read database server (the slave) is starting to find it difficult to keep up, you can always add additional read servers to your cluster. This is known as scaling your database servers horizontally. In terms of applications, this configuration requires that you have at least two data sources defined, one for write operations and the other for read operations.
A more rare scenario is where your database server(s) perform more writes than reads. That may require another topology called sharding, which involves splitting up your data across different tables or even across different physical databases. Sharding is most beneficial when you have a dataset that A) outgrows storage limits or B) contributes to unreasonable performance within a single database.
The master and slave(s) can reside on the same physical server or on different ones. Placing both on the same machine offers some performance advantages by omitting the shuttling of the data over the network or internet connection.
The Master -> Slave replication process can be either synchronous or asynchronous. The difference lies in the timing: if the changes are made to the Master and Slave at the same time, the process is said to be synchronous; if changes are queued up and written later, the process is considered asynchronous.
There are a number of ways of propagating changes to the slave databases. In Trigger-Based replication, triggers on columns in the Master system propagate write changes to the Slave system.
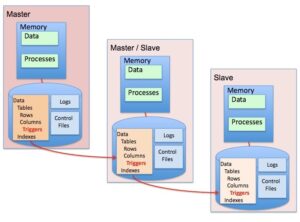
Fig 1 – Trigger-based replication | From Wikimedia Commons, the free media repository
Another replication mechanism called Row-based Replication was introduced in MySQL 5.1. It’s a type of binary logging that provides the best combination of data integrity and performance for many users.
In Log-based replication, the transaction log files are copied to another instance and replayed there. The log files are intended to reproduce a working version of the database in the event of a failure, so they represent an ideal mechanism for replicating data. This type of replication always works asynchronously.
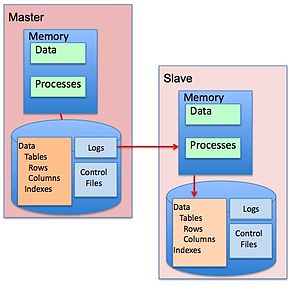
Fig 2 – Log-based replication | From Wikimedia Commons, the free media repository
Setting up the MySQL Slave Server
While setting up a single MySQL instance is fairly simple, adding a second MySQL server to the mix entails some extra effort. There are then a few extra steps to configure the master-slave replication. These differ based on your Operating System so I will describe the process for Linux and Windows in turn.
Recall that master-slave replication is a one-way mechanism from master to slave, whereby the master database is used for the write operations, while read operations are handled by the slave database(s). What this means is that we’ll need to have two MySQL instances running on the same box, at the same time. As we’ll see in a moment, we have to take steps to ensure a smooth coexistence between the two instances. This tutorial assumes that you’ve already got a MySQL instance running. We’ll make that database instance the master; hence, it will handle write operations. Next, we’ll create a 2nd database instance to act as the slave, for handling read operations.
Instructions for Linux
Due to the many flavors of Linux, note that the exact details of your installation may differ slightly. This tutorial uses Ubuntu Linux as the host operating system, thus the provided commands are for that operating system. If you want to setup your MySQL master-slave replication on a different flavor of Linux, you may need to make adjustments for its specific commands. Having said that, the general principles of setting up the MySQL master-slave replication on the same machine are basically the same for all Linux variations.
Installing mysqld_multi on Linux Systems
In order to manage two MySQL instances on the same machine efficiently on Linux, you’ll need to use mysqld_multi. It’s designed to manage several mysqld processes that listen for connections on different Unix socket files and TCP/IP ports. It can start or stop servers, or report their current status.
Note that, for some Linux platforms, MySQL installation from RPM or Debian packages includes systemd support for managing MySQL server startup and shutdown. On these platforms, mysqld_multi is not installed because it is unnecessary.
The first step in setting up mysqld_multi is to create two separate [mysqld] groups in the existing my.cnf file. On Ubuntu, the default location of the my.cnf file is /etc/mysql/.
Open my.cnf file in your favorite text editor and rename the existing [mysqld] group to [mysqld1]. This renamed group will be used for the configuration of the master MySQL instance. Each instance must have its own unique server-id, so add the following line in the [mysqld1] group:
server-id = 1
To create a separate [mysqld] group for the second MySQL instance, copy the [mysqld1] group with all current settings, and paste it directly below in the same my.cnf file. Now, rename the copied group to [mysqld2], and make the following changes in the configuration for the slave:
server-id = 2
port = 3307
socket = /var/run/mysqld/mysqld_slave.sock
pid-file = /var/run/mysqld/mysqld_slave.pid
datadir = /var/lib/mysql_slave
log_error = /var/log/mysql_slave/error_slave.log
relay-log = /var/log/mysql_slave/relay-bin
relay-log-index = /var/log/mysql_slave/relay-bin.index
master-info-file = /var/log/mysql_slave/master.info
relay-log-info-file = /var/log/mysql_slave/relay-log.info
read_only = 1
Some things to notice:
- To setup the second MySQL instance as a slave, we set its server-id to 2, so that it is different to the master’s server-id.
- Since both instances will run on the same machine, we set the port for the second instance to 3307; the first instance will continue to use the default port of 3306.
- In order to enable this second instance to use the same MySQL binaries, we need to set different values for the socket, pid-file, datadir and log_error.
- We also need to enable relay-log in order to use the second instance as a slave by setting the relay-log, relay-log-index and relay-log-info-file parameters, as well as master-info-file.
- Finally, the read_only parameter is set to 1 in order to make the slave instance read-only. Keep in mind that prior to MySQL 5.7.8, this option doesn’t completely prevent changes on the slave. Even when the read_only is set to 1, updates will still be permitted from users who have the SUPER privilege. More recent versions of MySQL has the super_read_only parameter to prevent SUPER users making changes.
In addition to the [mysqld1] and [mysqld2] groups, we also need to add a new group [mysqld_multi] to the my.cnf file:
[mysqld_multi]
mysqld = /usr/bin/mysqld_safe
mysqladmin = /usr/bin/mysqladmin
user = multi_admin
password = multipass
Once we install the second MySQL instance, and we start up both, we will grant appropriate privileges to the multi_admin user in order to be able to shut down both MySQL instances.
Create New Folders
In the previous step we prepped the my.cnf configuration file for the second MySQL instance. In that configuration file two new folders are referenced. The following Linux commands will create those folders with the appropriate privileges:
mkdir -p /var/lib/mysql_slave
chmod –reference /var/lib/mysql /var/lib/mysql_slave
chown –reference /var/lib/mysql /var/lib/mysql_slave
mkdir -p /var/log/mysql_slave
chmod –reference /var/log/mysql /var/log/mysql_slave
chown –reference /var/log/mysql /var/log/mysql_slave
AppArmor security settings on Ubuntu
In some Linux environments, including Ubuntu, AppArmor security settings are needed in order to run the second MySQL instance. AppArmor, which stands for “Application Armor”, is a Linux kernel security module that allows the system administrator to restrict programs’ capabilities with per-program profiles. Profiles can allow capabilities like network access, raw socket access, and the permission to read, write, or execute files on matching paths. To properly set-up AppArmor, add the following lines to the /etc/apparmor.d/usr.sbin.mysqld file using your favorite text editor:
/var/lib/mysql_slave/ r,
/var/lib/mysql_slave/** rwk,
/var/log/mysql_slave/ r,
/var/log/mysql_slave/* rw,
/var/run/mysqld/mysqld_slave.pid rw,
/var/run/mysqld/mysqld_slave.sock w,
/run/mysqld/mysqld_slave.pid rw,
/run/mysqld/mysqld_slave.sock w,
After you save the file, you’ll need to reboot the machine for the changes to take effect.
Installing the Second MySQL Instance
There are a few different approaches that you can follow in the installation of the second MySQL instance. We’ll be sharing the MySQL binaries, while employing separate data files for each installation.
Since we have already prepared the configuration file, necessary folders and security changes in the previous steps, the final installation step of the second MySQL instance is to initialize the MySQL data directory. Here’s the command to do that:
mysql_install_db –user=mysql –datadir=/var/lib/mysql_slave
Once MySQL data directory is initialized, you can start both MySQL instances using the mysqld_multi service:
mysqld_multi start
Set the root password for the second MySQL instance by using the mysqladmin with the appropriate host and port. Both the host and port are required, because if they are not specified, mysqladmin will connect to the first MySQL instance by default:
mysqladmin –host=127.0.0.1 –port=3307 -u root password rootpwd
In the example above I set the password to ìrootpwdî, but using a more secure password is recommended.
Windows Instructions
Again, the first step in setting up replication involves editing the my.cnf file. In this case, we’ll provide two local configuration files named “master.cnf” and “slave.cnf” that will be used when starting up the MySQL servers.
At a minimum you’ll want to add two options to the [mysqld] section of the master.cnf file:
- log-bin: in this example we choose master-bin.log.
- server-id: in this example we choose 1. The server cannot act as a replication master unless binary logging is enabled. The server_id variable must be a positive integer value between 1 to 2^32.
The master.cnf file:
[mysqld]
server-id=1
log-bin=master-bin.log
datadir=/home/robg/mysql/master/data
innodb_flush_log_at_trx_commit=1
sync_binlog=1
Note: For the greatest possible durability and consistency in a replication setup using InnoDB with transactions, you should also specify the innodb_flush_log_at_trx_commit=1, sync_binlog=1 options.
You’ll need to add the server-id option to the [mysqld] section of the slave’s slave.cnf file as well. It must be different from the ID of the master.
The slave.cnf file:
[mysqld]
server-id=2
relay-log-index=slave-relay-bin.index
relay-log=slave-relay-bin
datadir=/home/robg/mysql/slave/data
Next, start the MySQL servers from the command line or using the service manager if you’re running your instances as a service. Here are some example commands:
[admin@master ~]$ mysqld –defaults-file=/home/robg/mysql/master/master.cnf &
[admin@slave ~]$ mysqld –defaults-file=/home/robg/mysql/slave/slave.cnf&
Create the Replication User Account
We’ll need to create an account on the master server that the slave server can use to connect. This account must be given the REPLICATION SLAVE privilege:
[admin@master ~]$ mysql -u root –prompt=’master> ‘
master> CREATE USER [email protected];
master> GRANT REPLICATION SLAVE ON *.* TO [email protected] IDENTIFIED BY ‘admin’;
Initialize Replication
We are now ready to initialize replication on the slave using the CHANGE MASTER command:
slave> CHANGE MASTER TO MASTER_HOST=’192.168.0.31′,
-> MASTER_USER=’repl_user’,
-> MASTER_PASSWORD=’*********’,
-> MASTER_LOG_FILE=”,
-> MASTER_LOG_POS=4;
Here’s an explanation of each of the above parameters:
- MASTER_HOST: the IP or hostname of the master server, in this example “slave” or 192.168.0.31
- MASTER_USER: this is the user we granted the REPLICATION SLAVE privilege to above, in this example, “repl_user”
- MASTER_PASSWORD: this is the password we assigned to “rep_user” above
- MASTER_LOG_FILE: is an empty string although it would contain data if there were existing writes to be picked up from the master
- MASTER_LOG_POS: is 4 (again, this value would likely be different if there were existing writes to be picked up from the master
Lastly, issue the following command to start replication on the slave:
slave> start slave;
Configuration Option Tips
The MySQL 8.0 Reference Manual contains lots of useful information on running multiple MySQL instances on the same machine.
To summarize some of the key points:
- Parameters may be set on the command line, in configuration files, or by setting environment variables (though configuration files are recommended for replication). To see the values used by a given instance, you can connect to it and execute a SHOW VARIABLES statement.
- The primary resource managed by a MySQL instance is the data directory. Each instance should use a different data directory, the location of which is specified using the –datadir=dir_name option.
- In addition to using different data directories, several other options must have different values for each server instance:
-
- –port=port_num: –port controls the port number for TCP/IP connections. Alternatively, if the host has multiple network addresses, you can use –bind-address to cause each server to listen to a different address.
- –socket={file_name|pipe_name}: –socket controls the Unix socket file path on Unix or the named pipe name on Windows. On Windows, it is necessary to specify distinct pipe names only for those servers configured to permit named-pipe connections.
- –shared-memory-base-name=name: This option is used only on Windows. It designates the shared-memory name used by a Windows server to permit clients to connect using shared memory. It is necessary to specify distinct shared-memory names only for those servers configured to permit shared-memory connections.
- –pid-file=file_name: This option indicates the path name of the file in which the server writes its process ID.
- If you use the following log file options, their values must differ for each server:
- –general_log_file=file_name
- –log-bin[=file_name]
- –slow_query_log_file=file_name
- –log-error[=file_name]
- –tmpdir=dir_name: To achieve better performance, you can specify the –tmpdir option differently for each server, to spread the load between several physical disks.
Testing the Replication Process
You should at least perform a basic check to ensure that replication is indeed working. Here’s a simple example that inserts some data into the “test” table on the master server and then verifies that the new rows are replicated on the slave server:
master> insert into test values (1),(2),(3),(4);
slave> select * from test;
+—-+
| id |
+—-+
| 1 |
| 2 |
| 3 |
| 4 |
+—-+
Conclusion
In today’s blog, we learned how to set up a basic master-slave configuration with MySQL, using two servers on a single machine. In the next blog, we’ll explore how to set up slaves on different physical servers.